Click photos to enlarge.
I recently built this keepsake box that is inspired by Early American quilts. The "tumbling block" effect is created by assembling small wood blocks in a geometric pattern. Each piece is cut from a different type of wood and laid into a recess on the lid so the grain and color add distinction to the pattern.
 |
| Plans and Materials for the Keepsake Box |
I found the plan for the box in an issue of a woodworking magazine that I subscribe to. The instructions and drawings were pretty clear and with some left over materials from previous projects, I got started. The box sides and ends are maple and the top and bottom are made from 1/4" birch veneer plywood. I used cherry, walnut and maple for the quilt pattern.
 |
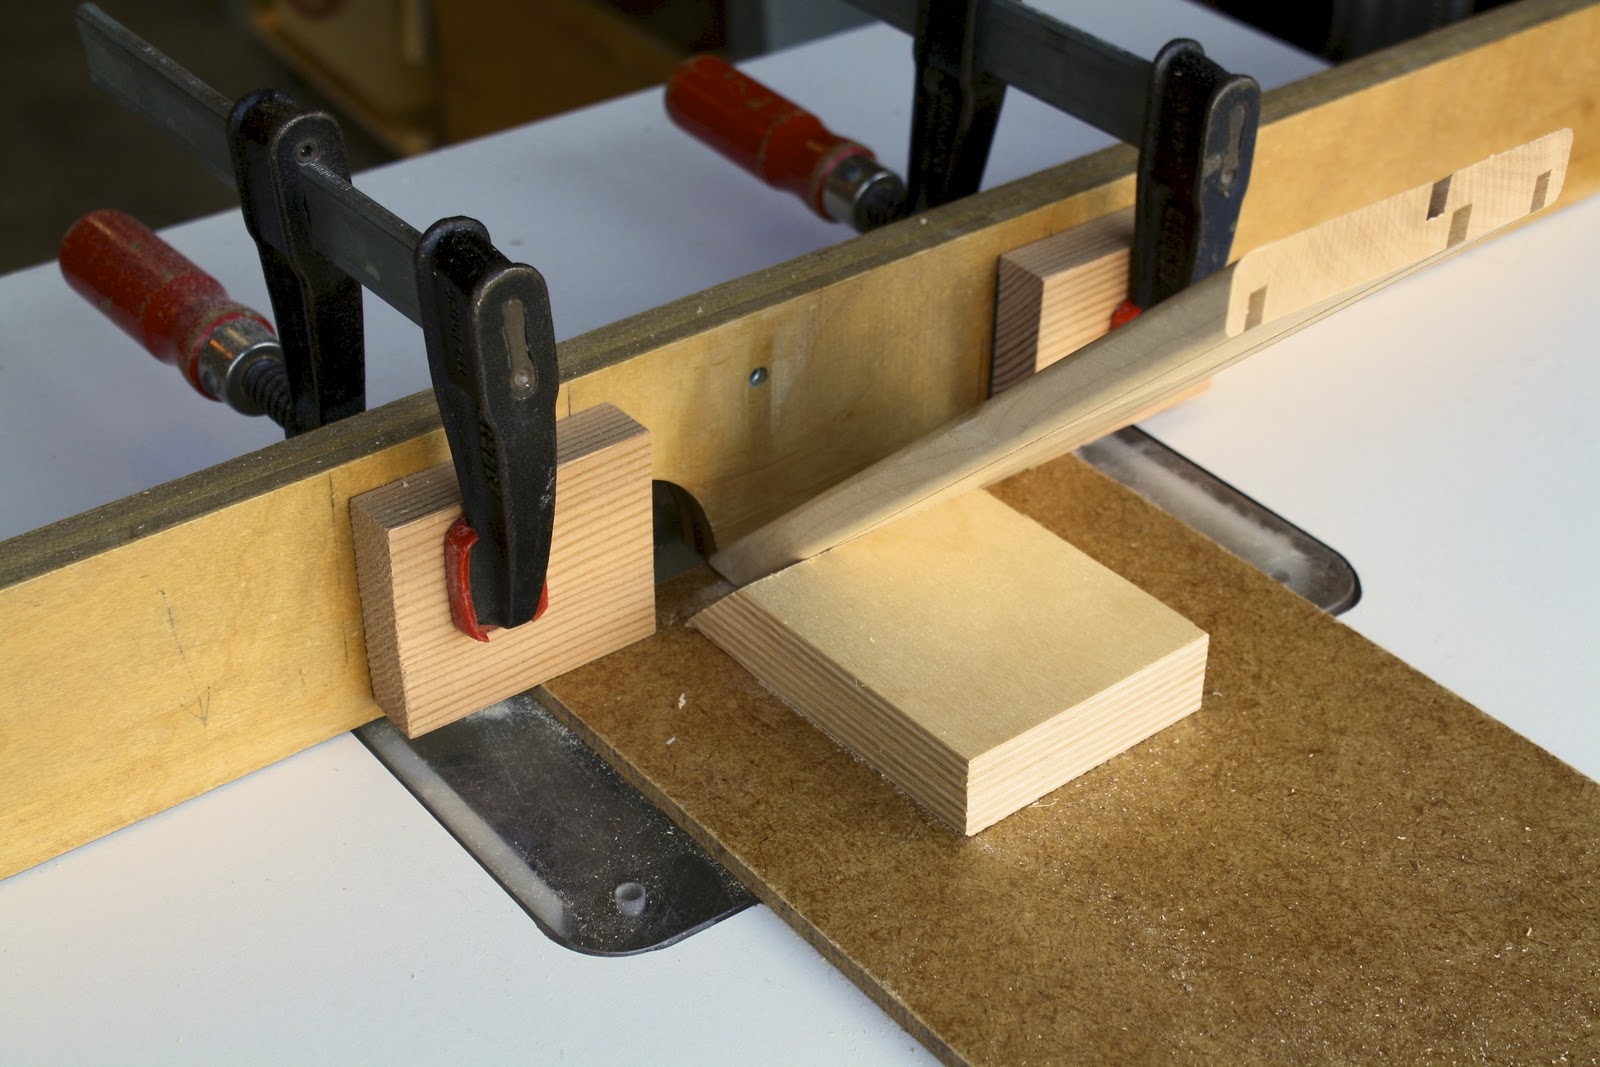
| Mitered Joint Reinforced with a Spline |
The first step was to plane the thickness and to cut the sides and ends to the finish width. Next, grooves were cut to accommodate the top and bottom and for the lid to interlock with the box to hold it in place. The sides and ends were cut to length with a 45 degree miter on each end. For the box to be square, the opposite sides needed to be the exact same length. The miter joints that join the box are reinforced with splines that fit into slots cut on the ends of the pieces. Miter joints are typically not a very strong joint, so the spline adds strength and helps with alignment.
 |
| Router Set Up for Cutting Spline Slots |
 |
| Spline Slot Cutting on the Miter Joint |
The slot was cut with a 1/8" diameter straight router bit. The bit was set to cut a 1/4" depth on the router table. The mitered end was lowered into the bit against the stop block and fed to the opposite stop block.
 |
| Glued Up Box |
Gluing and clamping was fairly easy since the lid was cut from the box later. The folding rule was used to measure the box diagonally. If the two diagonals are equal then the corners are 90 degrees or square...something I remember from 10th grade geometry class many years ago.
 |
| Interlocking Lid and Bottom |
Once the glue dried on the box, the next step was to cut the lid free with the table saw. Four cuts were made around the box between two opposite offset grooves to form the interlocking lid.
 |
| Cutting a "Tumbling Block" Piece on the Table Saw with the Miter Gage |
After the box was completed, the next step was to cut the various parts to create the "tumbling block" quilt effect. The blocks were cut to squares, rectangles, triangles, diamond shapes and parallelograms. The table saw with a sled attached to the miter gauge was used to cut the various shapes. Sandpaper glued to the sled kept the pieces in place. The pencil eraser held the pieces securely against the fence without getting fingers too close to the blade.
 |
| Rounding Over Pieces With a "Zero Clearance" fence on the Router Table |
 |
| Fitting the blocks to form the Quilt Pattern |
After the pieces were cut and fit to form the "tumbling block" quilt pattern, they were numbered and rounded over with a 1/8" radius round-over router bit. Because the pieces were so small, a special "zero clearance" fence was made and fastened to the router table with double sided tape. The purpose of the rounded edges was to create a "shadow" line to hide any edges the don't fit perfectly together. The pieces were then sanded and glued in place.
The box was sanded with 120 grit and 180 grit to a clean smooth surface. I applied three coats of tung oil to create a traditional hand rubbed finish.
Building the box with an intricate pattern on top was an exercise in patience and a fun challenge to my woodworking skills. It has already provided interesting conversation.


George, I just completed the same project and found it very rewarding. I used my compound miter saw for several of the cuts instead of the table saw. I did have trouble w/ the jig for the splines and assembled w/o them. Worked ok using the same strap clamp in your photo. I have people interested in having me make them for purchase. Any idea what to charge? Thanks. TTaylor
ReplyDeleteSorry to take so long to get back to you... Yes, the jig for the splines was an "exercise in tenacity." It will be easier on the next one. The strap clamp was one of the best things I've purchased for box making. I'm never sure what to charge folks. I generally build for family and friends. I'm happy with hugs and cookies. Keep on building... Geo
DeleteBeautiful work George. I'm thinking about making this project for my wife who is a quilter. I haven't bought the plans yet. What technique do they recommend for accurately cutting those tiny pieces? That's probably my biggest concern. Also, what company makes that clamp? Thank you, Robert.
ReplyDelete